Recordings
This content was presented to Nelson\Nygaard Staff at two successive Lunch and Learn webinars on Wednesday, March 31st, 2021 and Wednesday April 14th, 2021. Recordings are available for the first session here and the second session here. They are also embedded below.
Session 1
Session 2
What are Git & GitHub?
Git is a version control software that allows one or more collaborators to make changes to files, save their changes, and sync them back to the main source files. It allows more than one contributor to work on a project at the same time, often within the same file. It allows you to “rollback” one or more files to different versions, amongst other similar features. Git itself is the software that allows these features to work, but it’s pretty invisible and is mostly functioning in the background. Most people work with some type of additional software (like GitHub) to make working with Git easier and better!
GitHub is a cloud-based hosting service which hosts special file storage buckets called “repositories”. A repository (usually called a repo) is basically a directory or folder that is using git to track the repo for changes. GitHub lives in your browser, git lives on your computer. When you’re interacting with a repository locally and making and saving changes, you are interacting with git. When you are pushing those changes to the cloud so your fellow collaborators can access them, you’re interacting with GitHub.
GitHub has lots of snazzy features like the ability to create teams, make and track “issues”, handle annoying things called merge conflicts, and manage access to your repository, to name a few. You can also collaborate with or share the repository with a client after the fact.
The Basics
Follow good file naming conventions. Git is a software and it has to read your file names. Do not use spaces!
Git is initiated in a repo (or directory) and has the ability to watch everything that happens in that directory and any directory within it. However, it does not and probably should not track every single file. GitHub has space limitations and very large files (> 100 MB) can either go over those limits or make everything slow and usage very hard. Figuring out what to track and what not to can take some practice, but generally you only want to track files:
That are going to change
That your collaborators need and can’t reproduce easily (like R scripts, but tracking 100s of image files that a collaborator could produce by running a script might be less useful)
That are source data for scripts. This can sometimes be a problem if source files are very large, but there are other solutions, such as using a database, and external file storage that other users can access like Sharepoint, or using a cloud storage solution like AWS. Reach out to Bryan if you run into this.
Untracked files won’t change or be removed as you switch branches
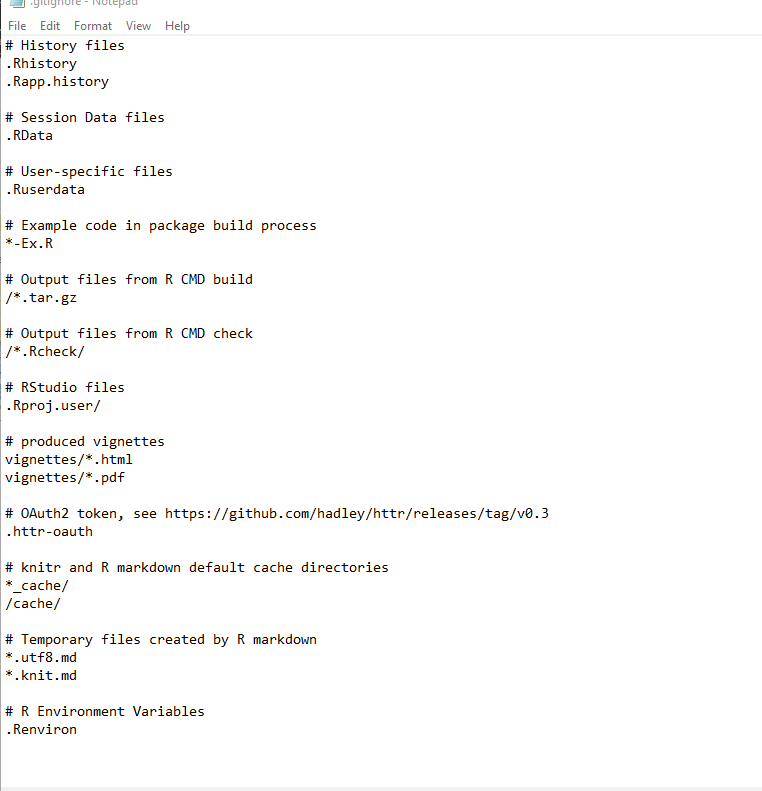
There is a difference between “ignoring” a file and not tracking it. Git has a special file type called a .gitignore. Git will read this file and determine a set of files and/or directories to ignore, aka not track or tell you anything about. Usually a .gitignore file is created when you create a repository and you can specify what kind you want based on what language you’re using. R is an option and will give you a typical R based .gitignore file (see below).
- The difference between not tracking and ignoring a file is that when you do not track a file, git will still recognize that it exists but it hasn’t been added to the repository tracking. See below for an example, you can see the untracked files in red text and right above that it say “Untracked files” and a message below that says untracked files are present, use “git add” to track them. This is what it looks like in Git Bash for untracked files that have not been added to .gitignore. Any files or file types that are included in the .gitignore file will not show up here at all.

- A default R based .gitignore file created by selecting this option when creating a repo on GitHub.
Basic Concepts
Repositories. As mentioned above, repositories are basically directories that are tracked by git. They live on GitHub but there is also a local version living on your machine.
Clone. Making a copy of a GitHub repository in such a way that the copy is still linked to the cloud version. This is different from making a truly distinct copy. It’s a local copy that you can make changes in and then push back to GitHub.
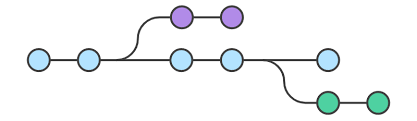
Branches. A branch is another version of a repository. This allows multiple people to work on the same file at once, on different branches.
The main branch is created by default and is considered the source of truth that other branches are merged into. This default branch used to be called master and you may still see that in a lot of documentation or older repositories.
ALL OF YOUR WORK SHOULD BE DONE ON A BRANCH THAT IS NOT MAIN!
- Working off of the main branch is dangerous because when you push changes, you can overwrite main without appropriately merging.
You can create your own branches and you can checkout and use branches that other people have created.
Staging or Adding. Telling git that your file is ready. You can add multiple files before you “commit”
Committing. Making a point in time save of your added files. This is similar to when you might make a copy of a document you’re working on and add your initials and the date as a point in time reference. Even if you’ve added your files to staging, you must commit them before pushing or switching to another branch.
Pushing. Taking all of your commits and sending them to the main repository in the cloud - GitHub.
Pull Requests. Once you’ve pushed your commits, you can make a pull request in GitHub that documents what your changes are and tests whether your changes can be merged into the main branch safely. A pull request is basically your way of letting other collaborators know your changes are ready and requesting that they can get merged into the main branch.
Merging. Taking your changes in a pull request and combining them into the main branch. Git does a lot of magic here.
Pulling. This is different from a pull request! Pulling usually happens when you are on a branch on your local machine and you need to access the new changes that have been merged into that branch on GitHub (remote). Think of pulling like refreshing your local version.
Other things we won’t cover but you might want to know about later.
- Reverting
- Merge conflicts
- Stashing
- Rebasing
Ways to Interact with Git (and GitHub)
- Directly through RStudio
- Using Git bash
- Git Bash is a terminal. It is standalone but is also integrated into RStudio.
- You will need to use this for complicated things outside of the basic workflow.
- Some very basic understanding of command line directory navigation is very helpful. Be careful! Git Bash is powerful, make sure you know what a command does before you use it.
- Git Client
- This is basically a Graphical User Interface (GUI) for interacting with Git and GitHub. You can think about it similar to RStudio. RStudio is a way to interact with R - but R is a separate thing. A GUI can help you use Git and interact with GitHub but it is not a replacement for either.
- There are a lot of different options, check out this helpful chapter which provides a list of clients.
Git-ting Started - Setup
Create a local folder on your machine
Our computers are constantly syncing with OneDrive. This is very good for lots of things! This is very bad for Git! We can get into the details later, but for now, create a local folder on your computer in a super secret place that does not sync with one drive - the user folder
Browse to this location on your computer with your username, e.g.,
C:\Users\NeedhamECreate a folder called “local”, or something similar
Create a folder inside of local called “GitHub”
- I like to clone all of my GitHub repos into the same location for easier organization. At the end of the day, as long as they are not being synced and they are not on the G drive or another shared drive, it’s up to you.
Make a GitHub Account
Make a GitHub account if you do not have one. This is your personal account that will then be linked to the Perkins + Will organizational account. It’s best to use your personal email address to create this account so that you can use it for other things and have it throughout the life of your career. You can link specific repositories to your NN email to send you notifications.
Update R & RStudio
If you need to have R or RStudio updated, reach out to IT and check in with Bryan about what version you should be getting.
Install Git
If you need Git installed, reach out to IT but first check in with Bryan about what version you should be getting and the installation instructions.
Let’s check that you have it installed.
Open Git Bash on your computer
Type the following:
which gitYou should see something like the following
- The print out beneath which git will show you the location of your git executable. Mine is here:
C:\Program Files\Git\mingw64\binvia the explorer
- The print out beneath which git will show you the location of your git executable. Mine is here:
You can then see what version you have installed:
git –versionIf you do not have git bash or it says “git: command not found”, you may not have git installed. Reach out to IT and first check in with Bryan.

Configuring Git and RStudio
RStudio Terminal Configuration
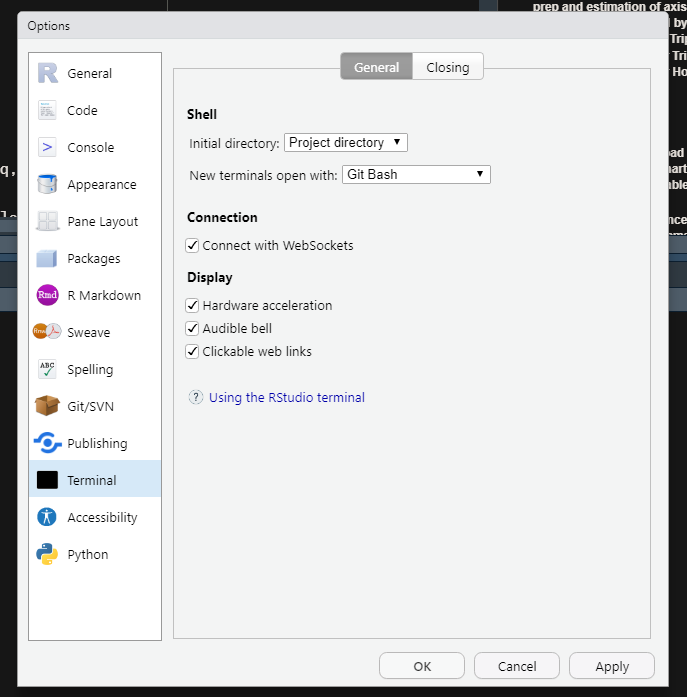
Open R studio and go to Tools → Global options → Terminal → set new terminals to open in Git Bash
If you don’t see Git Bash as an option, close all of your instances of RStudio and re-open. RStudio should recognize Git Bash as an option, if it doesn’t, let Bryan or I know. We might need to help set some path configurations.
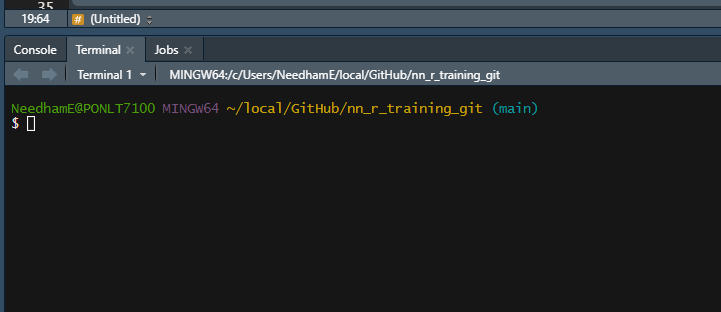
This is what your terminal should look like after configuration.
Configuring Git
This is one time configuration to set up your Git account with your username and email.
Using RStudio
- You can set your username and email directly through R studio using the “usethis” package
install.packages(“usethis”)library(usethis)use_git_config(user.name = "Jane Doe", user.email = "jane@example.org")- Your username and email are your GitHub account username and email, not your NN email.
- You can also access a Git Bash terminal through R studio. Go to Tools → Terminal → New terminal —– then follow instructions below for Git Bash commands.
Using Git Bash
- First check what your current configurations are
git config --list
- If you don’t see your username and email saved, set them with the following commands
git config --global user.name eneedhamgit config --global user.email esther.needham@gmail.com- Your username and email are your GitHub account username and email, not your NN email.
- Check again to see if it worked
git config --list- You should see it saved there
RStudio Git Walk Through
- Creating a repository on GitHub
- Cloning the repository to your local machine
- Creating and checking out a new branch
- Make changes to one or more files
- Stage the files
- Commit the staged files (with a commit message)
- Push the commit (or multiple commits)
- Create a pull request on GitHub.com
- Approve and merge the pull request into the base branch, usually “main”
- On your local machine, checkout main and pull the changes back down
I have screenshots for the website below but for now we are going to do this live!
Creating a repository on GitHub
Go to your account in GitHub and browse to the repositories section. Find the green button that says “New”. Click this and set up your repository, similar to below.
Give it a name without spaces. Your repo name will also be a directory name.
Select either public or private. Private repos in free personal accounts usually have a limit of how many collaborators can be included
Add a README file
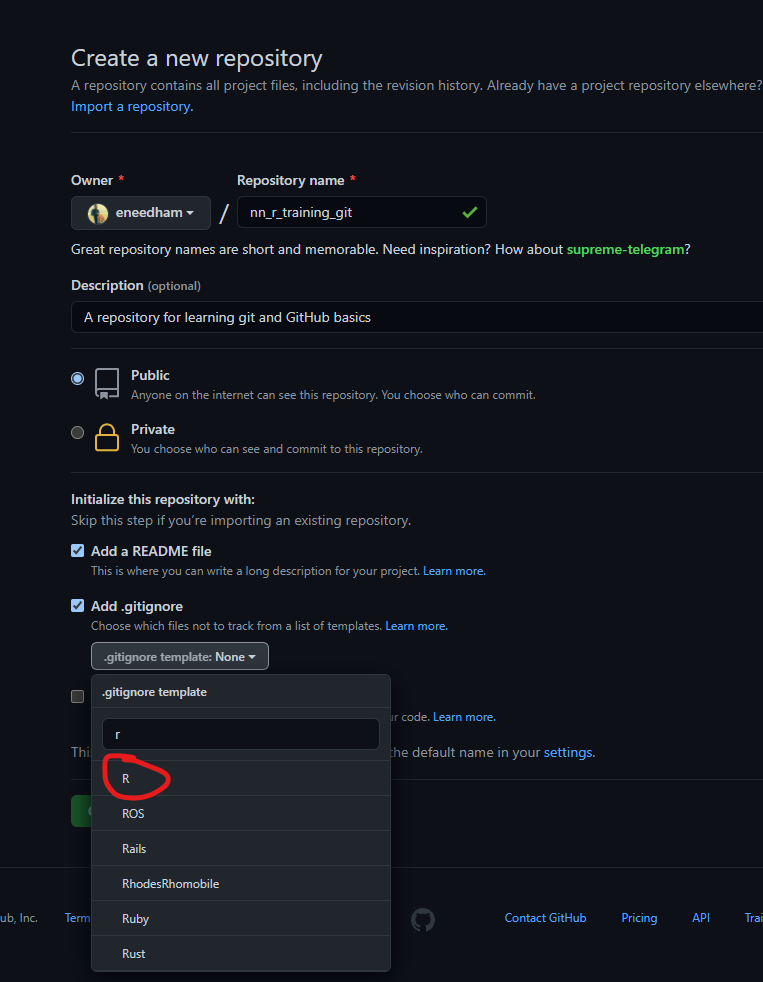
Add a .gitignore file and select the R template
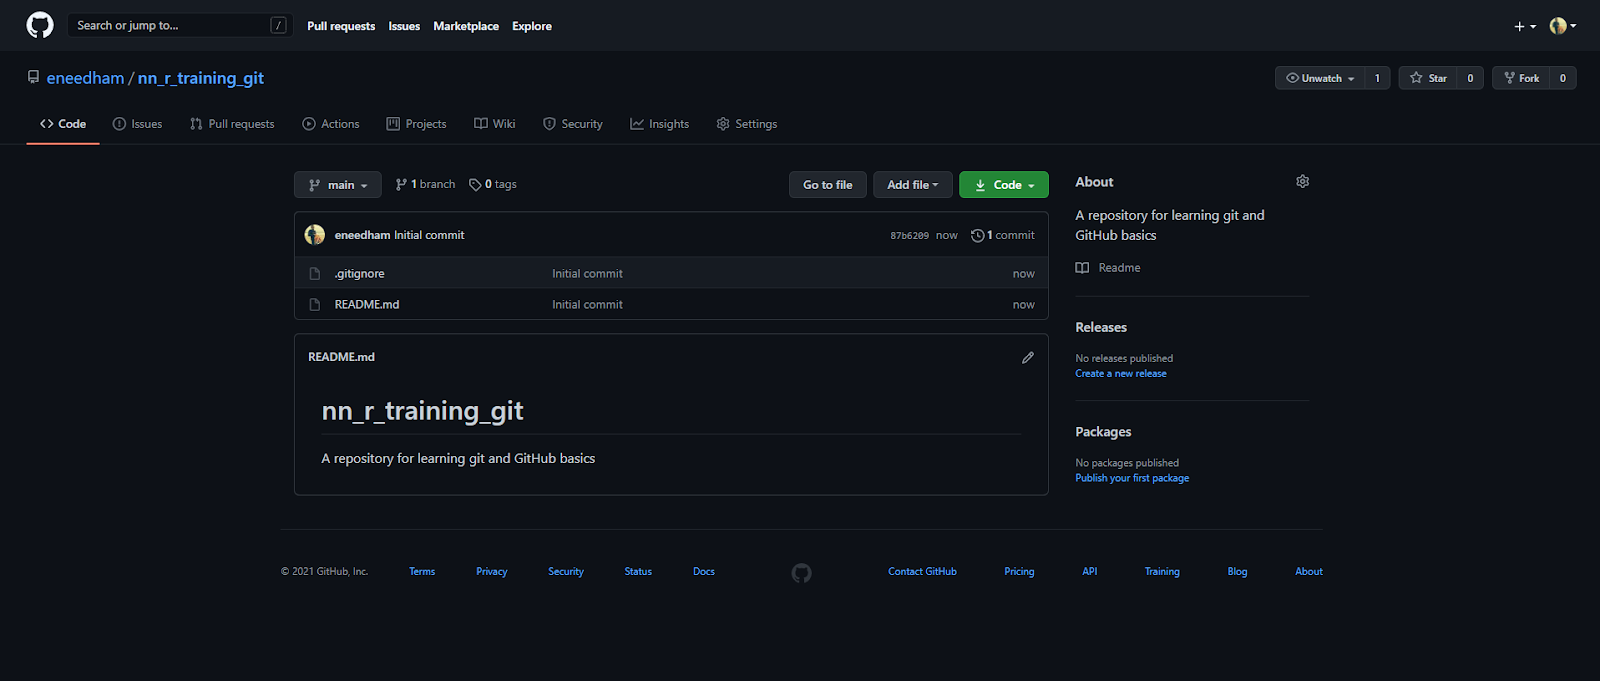
- Once created, your repository should look something like this. You can click the little pencil icon to edit and add more detail to your ReadMe file. ReadMe files are written in markdown.
Cloning a Repo to Your Local Machine
- Click the green “code” button in your repo and copy the HTTPS URL. HTTPS should work, but if you have something configured differently, you may need to use the SSH version instead.

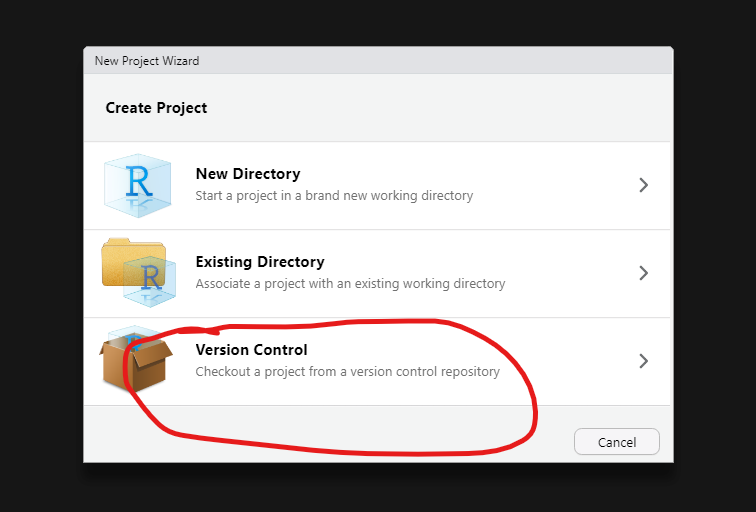
- We will clone using RStudio by creating a new project. In RStudio go to File → New Project. Then select “Version Control” then select Git.
- On the Git project wizard tab, paste in your repository URL that you copied in the first step. Make sure you browse to your local not syncing folder for the subdirectory to create it in (as discussed in the first step of Git-ting Started). Select “Open in new session” if you’d like.

- If you want to check that it worked, browse to the directory in your explorer. You can see all of the different files there, including the .gitignore file.

The Basic Workflow to Make and Push Changes
- Create and checkout a new branch. Go to the “Git” tab in R studio, usually near the “environment” tab. Click on the purple branch icon to create a new branch and type in the branch name. If you are collaborating with others in the repo, try to follow the convention of putting your initials and a dash at the beginning of the branch. Make your branch name somewhat descriptive but not too long. Do not use any spaces.


Once you create a branch, make sure that the top corner of your RStudio Git tab indicates you are now on your new branch. If not, hit the dropdown and switch branches. You can also do this to checkout a branch created by someone else.
Make changes to one or more files. You’ll see as you save changes, the files will appear in the Git tab. Once you are done, or at a place where you want to make a commit, check the box next to the files to add them to staging. You will need to do this every time you make changes.

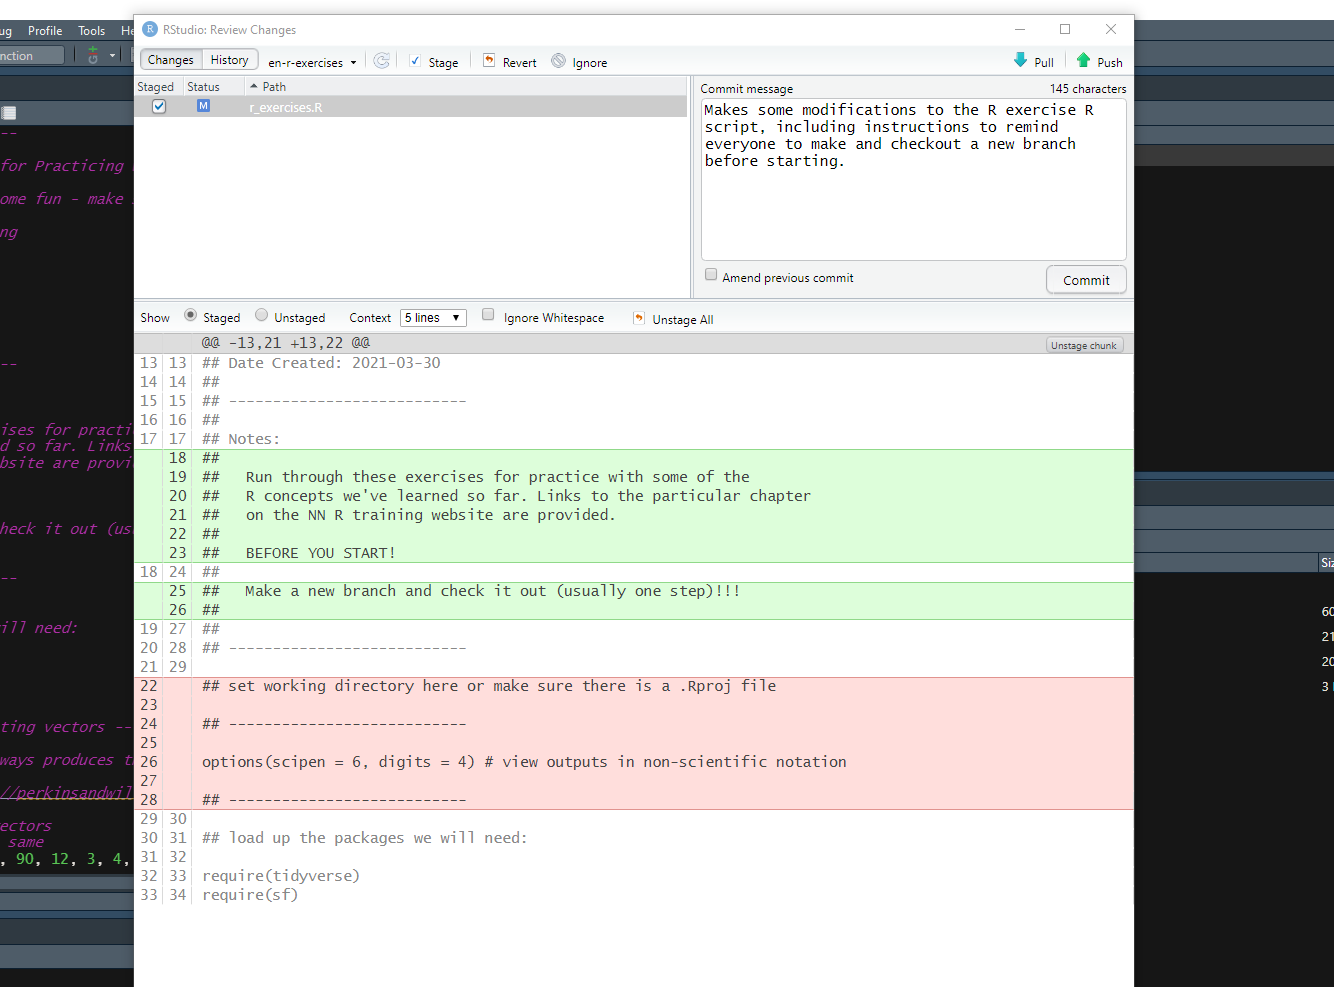
Once you’ve staged all the files you want to commit, hit commit. RStudio will open up another window. Type in a helpful but brief commit message. Hit commit.
- This window will also show you the “diff”. This is the difference between the version of the file you edited (red) and the edits (green).
Once you commit, you need to “push” your changes to GitHub. In the Git tab, you’ll see that it says “Your branch is ahead”. Hit the green Push arrow to push your commit.
- Note that you can make more than one commit before you push.

Create a pull request on GitHub. Go to your repository. If you just made a push you should have a notification on the main page letting you know that a pull request can be made. If not, just navigate to the Pull Requests tab and click New Pull Request and set your appropriate branches.
Fill out the Pull Request info. Pull requests should explain the changes that you made and give any relevant info to your collaborators (or your future self). The more changes that were made, the more detailed the Pull Request message should be. Here is a very simple one.
When you make a Pull Request you are setting what branch your changes are on and what branch you want to merge them into. Make sure you pick the right ones!


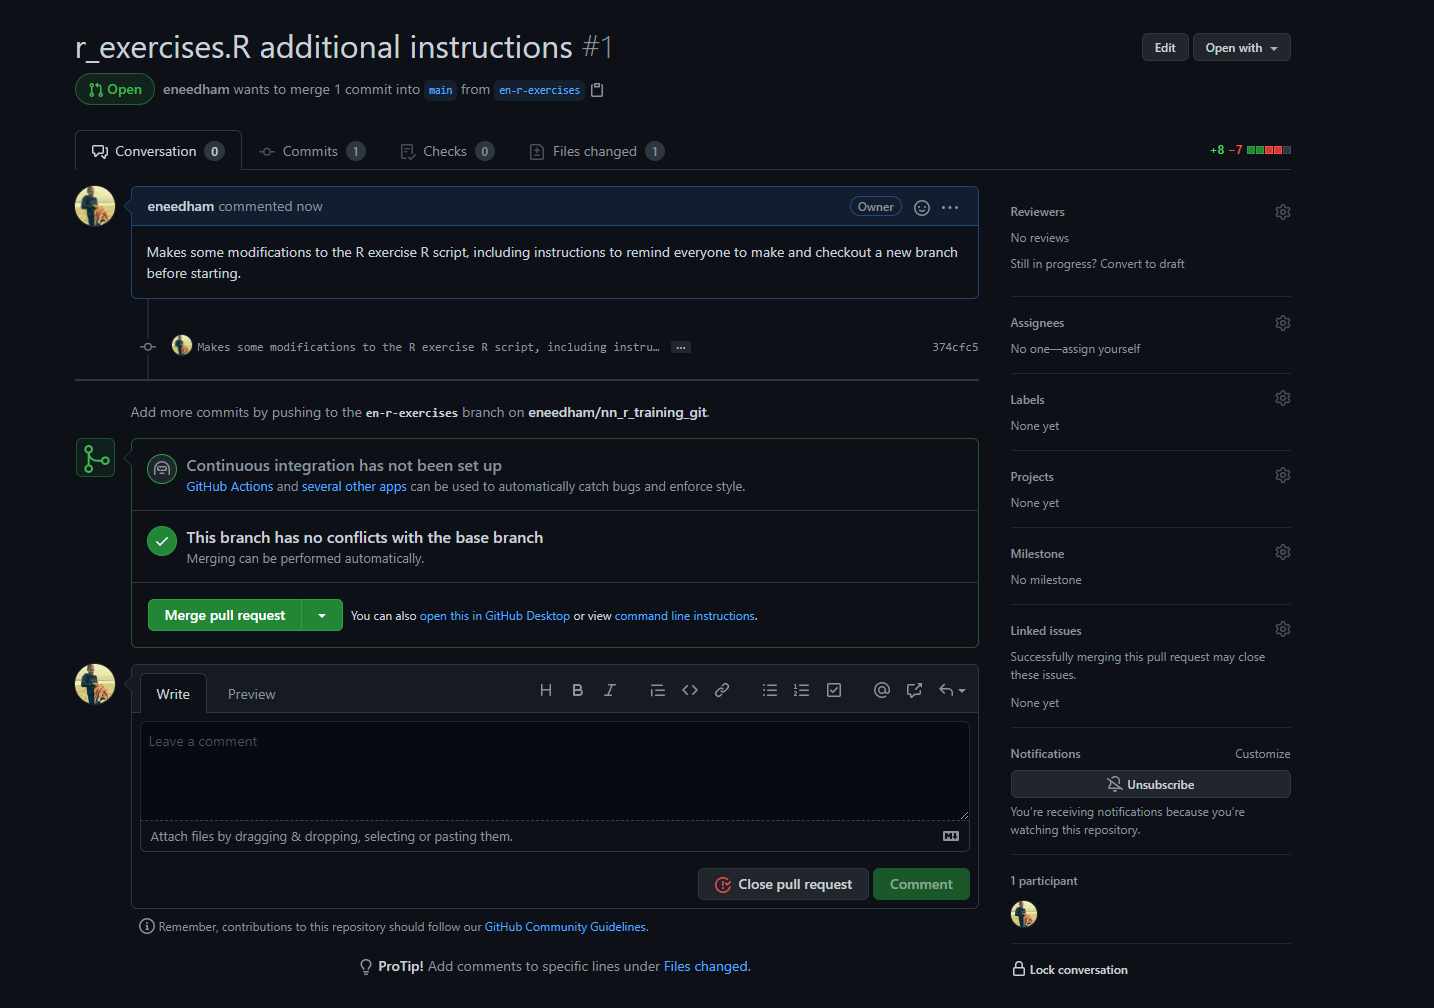
GitHub does some fancy work to check whether or not your changes can be automatically merged. If not, you will get a merge conflict. If this happens to you, reach out to Esther or Bryan unless you feel confident in fixing it.
For the Pull Request above you can see a green check mark and button that says Merge Pull Request. That means there are no conflicts and we can safely merge.
At this point, before merging, you may want to set a reviewer to look at your changes and test them out. A reviewer can pull down and check out your branch and look at your exact version of the file or files.
If all looks good and your reviewer (if you have one) approves your Pull Request, you can hit the Merge Pull Request button.
Your local version of the branch you merged into is now out of date and you’ll need “Pull”, or refresh, your local branch to have the new changes.
- Assuming you were merging into main branch, go ahead and check out Main in RStudio and then click Pull. This will bring down the newly merged main branch. You should always do this before creating a new branch! Otherwise your new branch will be based on an outdated version of main.